Overview
In this guide we will install Windows Feature “Telnet Client” with PowerShell Script. There are 3 methods of performing this task listed below, though we will work on PowerShell CLI and DISM command line methods in this document.- Install using GUI (control panel - Programs - Turn Windows Features on or off)
- Install using PowerShell
- Install using Command Prompt with “dism” command
Applies To
- Windows Server 2012
Telnet Client
Most of the times now a days we utilize telnet client for validating port open status on localhost and remote machine.Add Windows Feature
There are a number of features that Windows operating system provide in order to install non-default installed feature you can add the feature from the PowerShell, in this guide we install Windows-Feature “Telnet client”..Import Module – ServerManager
First and foremost thing after launching PowerShell Console with “Administrator” privilege, next step you will have to import module “ServerManager” Module.To import module in the current PowerShell session run the command;
Import-Module ServerManager

Add Feature – Telnet Client
Next step after importing the module is to invoke add feature method with feature method with feature that has to be installed on the host machine. To install telnet-client feature run the command;Add-WindowsFeature telnet-client
Add Feature – Status
After invoking add feature, when the feature is getting installed, current installation progress is shown on the host.Once the installation of the feature task is completed, installation status is displayed and if the installation was completed without any errors, “Exit Code” will be set as “Success”.

Remove Windows Feature
There are a number of features that Windows provide in order to install such feature you can add the feature from the PowerShell, here we will remove “Windows Feature” Telnet client.Import Module – ServerManager
First and foremost thing after launching PowerShell Console with “Administrator” privilege, next step you will have to import module “ServerManager” Module.To import module in the current PowerShell session run the command;
Import-Module ServerManager
Remove Feature – Telnet Client
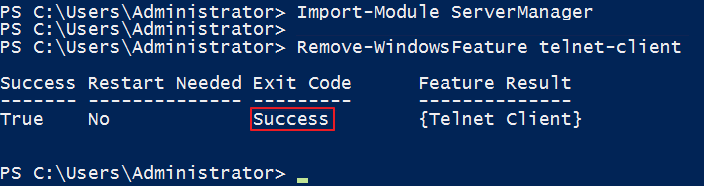
Once the removal of the feature is completed, to remove the installed windows feature, invoke the PowerShell command;Remove-WindowsFeature telnet-client

Remove Feature – Status
After invoking remove feature, when the feature is getting uninstalled, current uninstallation progress is shown on the host.After uninstallation of the feature task is completed, task status is shown and if the uninstallation is completed without any errors, “Exit Code” will be set as “Success”.
Alternate Method – DISM
You can also install Telnet Client using DISM (Deployment Image Servicing and Management) command below;dism /online /Enable-Feature /FeatureName:TelnetClient

My Blogging Site
Visit My Blogging SiteFor this specific article click on the below link. Thanks for reading.
Click Here for this article on Blogging Site
No comments:
Post a Comment