Overview
This guide will help in installing and configuring Amazon
AWS CLI for Windows.
Applies To
·
Amazon AWS, Tested on Windows 10
Pre-Requisites
·
None
AWS CLI
Installation comprises of two-step process, downloading and
installing AWS CLI MSI installer.
Download AWS CLI
In order to Install the AWS CLI on Windows, first we have to
download the appropriate MSI installer. Click on the below link to download,
according to the Windows architecture (32 or 64 Bit) that you intend to
install.
AWS CLI MSI – Arch
|
Download URL
|
Windows
(64-bit)
|
|
Windows
(32-bit)
|
Note: 64-bit
version of the AWS CLI does not currently work with Windows Server 2008
(version 6.0.6002). Please install
32-bit version of Windows.
Install AWS CLI
Run the downloaded MSI installer. And follow the
instructions and confirm the installation.
Installation Status
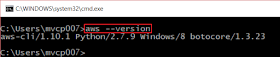
To confirm the installation status, start the command prompt
and run “aws --version”. Running the command will
display the AWS CLI version installed on the system.
Installation Path
After installation, depending on the OS architecture,
installation path will be as per the below table;
OS Architecture
|
Installation Path
|
64 Bit
|
C:\Program
Files\Amazon\AWSCLI
|
32 Bit
|
C:\Program
Files (x86)\Amazon\AWSCLI
|

Configure AWS CLI
Before you initiating the AWS CLI configuration, we collate
four information (parameters) listed below; To access the AWS Management
console successfully.
Parameters
|
Information Required
|
Comments
|
One
|
Access Key
ID
|
Is the
access key generated in AWS IAM management console
|
Two
|
Secret
Access Key
|
Access key
(password to login into AWS account)
|
Three
|
Default
Region Name
|
Optional; default region is “None”,
It’s region where the CLI has to query
|
Four
|
Default
Output Format
|
Optional; default output is “None”,
It’s output format each query executed
|
Create Access Key ID
To create the Access key, from the IAM dashboard, click on “Manage Security Credentials”; and
choose the option “Access Keys (Access Key ID and
Secret Access Key)” and click on “Create New Access
Key” button.

Note: Its
recommended you regenerate the key every 90 days.
Download Access Key ID
Once a new “Access
Key ID” is generated, click on “Download
Key File”. You have to download the file before closing it, else you will
not be able to download or retrieve it again.

Configure Access Key
To configure the access key, launch command prompt and run
the command;

List AWS Configure List
To list CLI configured list, run the command;
aws configure list

List IAM Access Key Info
To list of access key’s configured for the account, run the command;
aws iam list-access-keys

List IAM UserNames only
List all users created in IAM, run the command;
aws iam list-users --query
"Users[].[UserName]" or
aws iam list-users --query
"Users[].UserName"

List Specific User Info
To verify if specific user exists to retrieve from IAM users,
run the command;
aws iam get-user --user-name
vcp.muthukrishna@eone.com –output=json | find /I "UserName"
List All IAM Users
List all the users created in IAM, run the command;
aws iam list-users
Slideshare Information
A downloadable document is uploaded to docushare to Slideshare.
No comments:
Post a Comment