Overview
It’s a distributed remote execution system used to execute commands and query data on remote nodes, either individually or by arbitrary selection criteria.
One of the major advantages of implementing “Salt” in managing your existing infrastructure are;
| Features | Description |
|---|---|
| Simplicity | |
| Parallel Execution | |
| Fast, Flexible and scalable | |
| Built on Proven Technology | |
| Python client Interface | |
| Open Source |
Applies To
- Ubuntu 14.x, tested on Ubuntu 14.04.2 LTS
Pre-requisites
- Python 2.7.6 or above.
- Preferably, configuring salt master server hostname as “salt” is good.
- System Update (Re-synchronize Repository – Packages & dependencies).
Install Salt
To install salt packages, saltstack personal package archives (PPA) repository has to be added. In this section we will install PPA, install saltstack packages.What is PPA?
Personal Package Archives , allow you to upload Ubuntu source packages to be built and published as an apt repository by Launchpad. PPAs are for non-standard software/updates.Install PPA Salt Repository
To install saltstack bundle, saltstack repository has to be added to the system; to add “SaltStack PPA” run the command;dpkg-query -W --showformat='${Package}\t ${Status}\n' salt-*

Since saltstack related packages are not installed, we will go ahead and add PPA saltstack repository, to add new repository run the command;
sudo add-apt-repository ppa:saltstack/salt

Package Install – Resync Package & Dependencies
After adding saltstack repository, overall update (re-synchronization) from different repository for latest packages and dependencies with newer versions is fetched and listed for update.List of available packages is fetched from “/etc/apt/sources.list” file, to update run the command;
sudo apt-get update

Note: To upgrade the package(s) “apt-get upgrade
Salt Master – Install Package
After confirming the pre-requisites are met, PPA is installed and system package update is done, next step is to install salt master and related packages.sudo apt-get install salt-master salt-minion salt-cloud salt-doc

Salt Master – View Package
Once the installation of the salt-master is done, you can verify the installation status manually, by running the either of the below command(s);dpkg-query -l salt* or
dpkg-query -W --showformat='${Package}\t ${Status}\n' salt-*

Salt Master Configuration
After installing salt-master package on the server, there are few configurations steps have to be done so that salt master can work efficiently.When we start configuring saltstack, salt configuration directories have to be created, these directories contain configuration management instructions; different configuration sections are listed below;
- Salt Directories
- File Roots
- Pillar Roots
- Configure Firewall
- Configure Minion
- Key Management
- Test Minion
Create Salt Directories
In this section we will create basic directories that are needed for salt, create directories for file server & pillar; to create directories run the command; if the directories already exists, ignore command execution;sudo mkdir -p /srv/{salt,pillar}

Salt Directories – File Roots
The Salt file server defaults to the mandatory base environment. This environment MUST be defined and is used to download files when no environment is specified.Environments allow for files and sls data to be logically separated, but environments are not isolated from each other. This allows for logical isolation of environments by the engineer using Salt, but also allows for information to be used in multiple environments.
This file server is built into the master daemon and does not require a dedicated port.
By default this configuration entry is disabled, to enable uncomment the entries as below;
file_roots:
base:
- /srv/salt

Note: This attribute specifies the locations where the salt master has to look for configuration management instructions.
Salt Directories – Pillar Roots
Pillars are tree-like structures of data defined on the Salt Master and passed through to minions. They allow confidential, targeted data to be securely sent only to the relevant minion.By default this configuration entry is disabled, to enable uncomment the entries as below;
pillar_roots:
base:
- /srv/pillar

Configure Firewall – UFW Rules
When salt is installed, salt installs firewall rules its read when the firewall is enabled, upon enabling firewall will read salt firewall rules from the salt configuration file, stored in the folder;ls -l /etc/ufw/applications.d/

View Firewall Rules – Salt Rules
By default all application related firewall rules are stored in the directory “/etc/ufw/applications.d/”, each application is configured as the need similarly, salt firewall rules file “salt.ufw” is created in the directory, To view the rules that would be configured by salt when activated, run the command;cat /etc/ufw/applications.d/salt.ufw

View Firewall Rules – Current Rules
Before we configure the firewall rules, check current firewall rules configured on the server, run the command; you need to switch to super user to check the firewall rules.ufw status

Activate Firewall Rule - Salt
If the firewall is enabled, activation of salt service rule(s) is necessary, to activate the firewall rule; run the command;ufw allow salt

Configure Minion
We will configure only master attribute which is required for the minion to connect & communicate.In this demonstration, the minion should connect to the master process that is running on the same machine as master. (both master and minion are deployed on same server)
Set the master key as local loopback address i.e., “127.0.0.1” in order for the minion to correctly connect.
vi /etc/salt/minion
master: 127.0.0.1

Service Management – Salt
After configuring salt-minion, salt-master and salt-minion service have to started, this can be done with service manager (system manager utility).Service Start – salt-master & salt-minion
To start the salt-master service & salt-minion service, run the command;sudo service salt-master start
sudo service salt-minion start

Service Stop – salt-master & salt-minion
To stop the salt-master service & salt-minion service, run the command;sudo service salt-master stop
Service Status – salt-master & salt-minion
To check the service current status of salt-master service & salt-minion service, run the command;sudo service salt-master status
Salt Key Management – Key Identity
Salt provides commands to validate the identity of your Salt master and Salt minions before the initial key exchange.Validating key identity helps avoid inadvertently connecting to the wrong Salt master, and helps prevent a potential MiTM (man-in-the-middle) attack when establishing the initial connection.
Salt-Key Management – Key Identity - Status Table
Salt-key executes simple management of Salt server public keys used for authentication.Initially when the connection has to be established between Salt server and Salt Minion, a public key is generated and sent to salt master. Generated key has to be accepted by Salt-Master. Following table will give insight into the different states of keys and its purpose.
| Minion-key Status | Purpose |
|---|---|
| Unaccepted Keys | Key is waiting to be accepted by the salt-master |
| Denied Keys | Key was rejected using salt-key command; these minions can’t communicate with salt-master |
| Accepted Keys | Key has been accepted and minion can communicate with salt-master |
| Rejected Keys | Key has been rejected by salt-master automatically, this state occurs when there is a duplicate Minion ID, minion was rebuilt or when minion has created a new key without deleting old minion key. |
Salt-Key Management – Key Identity - Commands Table
Basic key management commands are listed below;| Salt-key Command | Minion Key States |
|---|---|
| salt-key -L | List all Keys |
| Salt-key -F | Print all keys fingerprints |
| salt-key -a | Accept Keys |
| salt-key -l <Argument> | List keys based on argument(all, accepted, rejected, denied and rejected) |
| salt-key -d <Argument> | Delete Key |
Key Management
Key management of salt-master and salt-minion is one of the most important tasks, which enables authentication & communication between master/minion(s).Key Management - Listing Keys
After starting salt-master & salt-minion, salt-minion will automatically generate key, this key has to be accepted for authentication and communication between salt-master and salt-minion, when salt-minion is started a key will be sent to salt-master; to list all the keys run the command;salt-key --list all

Salt Key Management – Key Fingerprint – Master
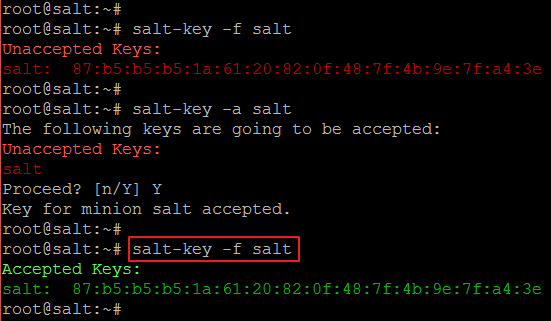
After listing the keys, to accept the key that is generated, run the command; keys generate on minion and listed on master should match, to know the key of a minion run the command;salt-key -f salt

Salt Key Management – Key Fingerprint – Minion
After starting the salt-minion, a key is generated automatically, to know the key of local minion key run the command;salt-call key.finger --local

Salt Key Management – Accept Key
After validating the key on salt-master and salt-minion, go ahead and accept the key on the salt-master, to accept the key run the command;salt-key -a salt

Salt Key Management – Verify Accept Key
After accepting the key on salt-master, to validate if the key is accepted run the command;salt-key -f salt
Test Minion
Once the key is accepted, we can do a test minion’s. In this section we will test few commands such as (test.ping and cmd.run).Salt Master – Test.Ping
We will run a first minion command, this command will communicate from salt-master and retrieve current status all the minions “test.ping” all servers and show the results.If the minion is communicating command will return “True” else it will return “False”.
Note: test.ping is not an ICMP ping command.
salt '*' test.ping

Salt Master – Cmd.Run
To run a command on the server, that is passed as an argument.salt '*' cmd.run 'free -m'

Salt Master – Cmd.Run – Filtered Output
To run a command on the server, that is passed as an argument with a filtered output.salt '*' cmd.run 'df -kh | grep -E "mapper|\root"'

No comments:
Post a Comment